


CKA Questions Pass on Your First Attempt Dumps for Kubernetes Administrator Certified
CKA Practice Test Pdf Exam Material
NEW QUESTION # 10
Create a busybox pod and add "sleep 3600" command
Answer:
Explanation:
kubectl run busybox --image=busybox --restart=Never -- /bin/sh -c "sleep 3600"
NEW QUESTION # 11
You must connect to the correct host.
Failure to do so may result in a zero score.
[candidate@base] $ ssh Cka000047
Task
A MariaDB Deployment in the mariadb namespace has been deleted by mistake. Your task is to restore the Deployment ensuring data persistence. Follow these steps:
Create a PersistentVolumeClaim (PVC ) named mariadb in the mariadb namespace with the following specifications:
Access mode ReadWriteOnce
Storage 250Mi
You must use the existing retained PersistentVolume (PV ).
Failure to do so will result in a reduced score.
There is only one existing PersistentVolume .
Edit the MariaDB Deployment file located at ~/mariadb-deployment.yaml to use PVC you created in the previous step.
Apply the updated Deployment file to the cluster.
Ensure the MariaDB Deployment is running and stable.
Answer:
Explanation:
Task Overview
You're restoring a MariaDB deployment in the mariadb namespace with persistent data.
# Tasks:
* SSH into cka000047
* Create a PVC named mariadb:
* Namespace: mariadb
* Access mode: ReadWriteOnce
* Storage: 250Mi
* Use the existing retained PV (there's only one)
* Edit ~/mariadb-deployment.yaml to use the PVC
* Apply the deployment
* Verify MariaDB is running and stable
Step-by-Step Solution
1## SSH into the correct host
ssh cka000047
## Required - skipping = zero score
2## Inspect the existing PersistentVolume
kubectl get pv
# Identify the only existing PV, e.g.:
NAME CAPACITY ACCESS MODES RECLAIM POLICY STATUS CLAIM STORAGECLASS
mariadb-pv 250Mi RWO Retain Available <none> manual
Ensure the status is Available, and it is not already bound to a claim.
3## Create the PVC to bind the retained PV
Create a file mariadb-pvc.yaml:
cat <<EOF > mariadb-pvc.yaml
apiVersion: v1
kind: PersistentVolumeClaim
metadata:
name: mariadb
namespace: mariadb
spec:
accessModes:
- ReadWriteOnce
resources:
requests:
storage: 250Mi
volumeName: mariadb-pv # Match the PV name exactly
EOF
Apply the PVC:
kubectl apply -f mariadb-pvc.yaml
# This binds the PVC to the retained PV.
4## Edit the MariaDB Deployment YAML
Open the file:
nano ~/mariadb-deployment.yaml
Look under the spec.template.spec.containers.volumeMounts and spec.template.spec.volumes sections and update them like so:
Add this under the container:
yaml
CopyEdit
volumeMounts:
- name: mariadb-storage
mountPath: /var/lib/mysql
And under the pod spec:
volumes:
- name: mariadb-storage
persistentVolumeClaim:
claimName: mariadb
# These lines mount the PVC at the MariaDB data directory.
5## Apply the updated Deployment
kubectl apply -f ~/mariadb-deployment.yaml
6## Verify the Deployment is running and stable
kubectl get pods -n mariadb
kubectl describe pod -n mariadb <mariadb-pod-name>
# Ensure the pod is in Running state and volume is mounted.
# Final Command Summary
ssh cka000047
kubectl get pv # Find the retained PV
# Create PVC
cat <<EOF > mariadb-pvc.yaml
apiVersion: v1
kind: PersistentVolumeClaim
metadata:
name: mariadb
namespace: mariadb
spec:
accessModes:
- ReadWriteOnce
resources:
requests:
storage: 250Mi
volumeName: mariadb-pv
EOF
kubectl apply -f mariadb-pvc.yaml
# Edit Deployment
nano ~/mariadb-deployment.yaml
# Add volumeMount and volume to use the PVC as described
kubectl apply -f ~/mariadb-deployment.yaml
kubectl get pods -n mariadb
NEW QUESTION # 12
Deployment
a. Create a deployment of webapp with image nginx:1.17.1 with
container port 80 and verify the image version
- A. // Create initial YAML file with -dry-run option
kubectl create deploy webapp --image=nginx:1.17.1 --dryrun=client -o yaml > webapp.yaml vim webapp.yaml apiVersion: apps/v1 kind: Deployment metadata:
labels:
app: webapp
name: webapp
spec: replicas: 1 containers: - image: nginx:1.17.1 name: nginx kubectl create -f webapp.yaml -record=true //Verify Image Version kubectl describe deploy webapp | grep -i "Image" Using JsonPath kubectl get deploy -o=jsonpath='{range.items [*]}{.[*]} {.metadata.name}{"\t"}{.spec.template.spec.containers[*].i mage}{"\n"}' - B. // Create initial YAML file with -dry-run option
kubectl create deploy webapp --image=nginx:1.17.1 --dryrun=client -o yaml > webapp.yaml vim webapp.yaml apiVersion: apps/v1 kind: Deployment metadata:
labels:
app: webapp
name: webapp
spec: replicas: 1 selector: matchLabels: app: webapp template: metadata: labels: app: webapp spec: containers: - image: nginx:1.17.1 name: nginx kubectl create -f webapp.yaml -record=true //Verify Image Version kubectl describe deploy webapp | grep -i "Image" Using JsonPath kubectl get deploy -o=jsonpath='{range.items [*]}{.[*]} {.metadata.name}{"\t"}{.spec.template.spec.containers[*].i mage}{"\n"}'
Answer: B
NEW QUESTION # 13
You must connect to the correct host.
Failure to do so may result in a zero score.
[candidate@base] $ ssh Cka000055
Task
Verify the cert-manager application which has been deployed to your cluster .
Using kubectl, create a list of all cert-manager Custom Resource Definitions (CRDs ) and save it to ~/resources.yaml .
You must use kubectl 's default output format.
Do not set an output format.
Failure to do so will result in a reduced score.
Using kubectl, extract the documentation for the subject specification field of the Certificate Custom Resource and save it to ~/subject.yaml.
Answer:
Explanation:
Task Summary
You need to:
* SSH into the correct node: cka000055
* Use kubectl to list all cert-manager CRDs, and save that list to ~/resources.yaml
* Do not use any output format flags like -o yaml
* Extract the documentation for the spec.subject field of the Certificate custom resource and save it to ~
/subject.yaml
Step-by-Step Instructions
Step 1: SSH into the node
ssh cka000055
Step 2: List cert-manager CRDs and save to a file
First, identify all cert-manager CRDs:
kubectl get crds | grep cert-manager
Then extract them without specifying an output format:
kubectl get crds | grep cert-manager | awk '{print $1}' | xargs kubectl get crd > ~/resources.yaml This saves the default kubectl get output to the required file without formatting flags.
Step 3: Get documentation for spec.subject in the Certificate CRD
Run the following command:
kubectl explain certificate.spec.subject > ~/subject.yaml
This extracts the field documentation and saves it to the specified file.
If you're not sure of the resource, verify it exists:
kubectl get crd certificates.cert-manager.io
Final Command Summary
ssh cka000055
kubectl get crds | grep cert-manager | awk '{print $1}' | xargs kubectl get crd > ~/resources.yaml kubectl explain certificate.spec.subject > ~/subject.yaml
NEW QUESTION # 14
Create a PersistentVolumeClaim of at least 3Gi storage and access mode ReadWriteOnce and verify status is Bound
- A. vim task-pv-claim.yaml
apiVersion: v2
kind: PersistentVolumeClaim
metadata:
name: task-pv-claim
spec:
storageClassName: ""
accessModes:
- ReadWriteOnce
resources:
requests:
storage: 4Gi
kubectl apply -f task-pv-claim.yaml
//Verify
kubectl get pv
NAME CAPACITY ACCESS
MODES RECLAIM POLICY STATUS CLAIM
STORAGECLASS REASON AGE
task-pv-volume 4Gi RWO
Retain Bound default/task-pv-claim
6m16s
kubectl get pvc
NAME STATUS VOLUME
CAPACITY ACCESS MODES STORAGECLASS AGE
task-pv-claim Bound task-pv-volume
5Gi RWO 6s - B. vim task-pv-claim.yaml
apiVersion: v1
kind: PersistentVolumeClaim
metadata:
name: task-pv-claim
spec:
storageClassName: ""
accessModes:
- ReadWriteOnce
resources:
requests:
storage: 3Gi
kubectl apply -f task-pv-claim.yaml
//Verify
kubectl get pv
NAME CAPACITY ACCESS
MODES RECLAIM POLICY STATUS CLAIM
STORAGECLASS REASON AGE
task-pv-volume 5Gi RWO
Retain Bound default/task-pv-claim
6m16s
kubectl get pvc
NAME STATUS VOLUME
CAPACITY ACCESS MODES STORAGECLASS AGE
task-pv-claim Bound task-pv-volume
5Gi RWO 6s
Answer: B
NEW QUESTION # 15
You have a deployment named 'my-app' running a web application that uses an external database service. You need to configure a 'ClusterlP' service to route traffic to the external database service.
Answer:
Explanation:
See the solution below with Step by Step Explanation.
Explanation:
Solution (Step by Step) :
1 . Create the ClusterlP service:
- Create a 'ClusterlP' service that points to the external database service using the 'externalName' field.
2. Apply the service: - Apply the YAML file using 'kubectl apply -f external-db-service.yamr 3. Verify the service: - Check the status of the service using 'kubectl get services external-db-service -n ' 4. Test the service: - From a pod in the same namespace as the service, try to connect to the external database service using the 'external-db-service' service name and port. Note: - Replace with the actual namespace. - Replace 'my-external-db.example.com' with the actual hostname of your external database service. - Ensure that your cluster has access to the external database service.
NEW QUESTION # 16
Create a deployment named "myapp" that having 2 replicas with
nginx image and expose deployment as service named "myservice"
- A. // Create a YAML Template
kubectl create deploy myapp --image=nginx --dry-run -o yaml >
myapp.yaml
//Update replicas=2 in myapp.yaml file
apiVersion: apps/v1
kind: Deployment
metadata:
labels:
app: myapp
name: myapp
spec:
replicas: 2
selector:
matchLabels:
app: myapp
template:
metadata:
labels:
app: myapp
spec:
containers:
- image: nginx
name: nginx
// Create deployment
kubectl create -f myapp.yaml
// Creating YAML template for service
kubectl expose deployment myapp --type=ClusterIP --port=80 --
target-port=80 --name=myservice --dry-run -o yaml >
myservice.yaml
YAML File:
apiVersion: v1
kind: Service
metadata:
labels:
app: myapp
name: myservice
spec:
ports:
- port: 80
protocol: TCP
targetPort: 80
selector:
app: myapp
type: ClusterIP
kubectl get svc
NAME TYPE CLUSTER-IP EXTERNAL-IP PORT(S)
AGE
kubernetes ClusterIP 10.2.0.1 <none> 443/TCP
158d
myservice ClusterIP 10.2.96.175 <none> 80/TCP
40s - B. // Create a YAML Template
kubectl create deploy myapp --image=nginx --dry-run -o yaml >
myapp.yaml
//Update replicas=2 in myapp.yaml file
apiVersion: apps/v1
kind: Deployment
metadata:
labels:
app: myapp
name: myapp
spec:
replicas: 2
selector:
matchLabels:
app: myapp
template:
metadata:
labels:
app: myapp
spec:
containers:
- image: nginx
name: nginx
// Create deployment
kubectl create -f myapp.yaml
// Creating YAML template for service
kubectl expose deployment myapp --type=ClusterIP --port=60 --
target-port=60 --name=myservice --dry-run -o yaml >
myservice.yaml
YAML File:
apiVersion: v1
kind: Service
metadata:
labels:
app: myapp
name: myservice
spec:
ports:
- port: 60
protocol: TCP
targetPort: 80
selector:
app: myapp
type: ClusterIP
kubectl get svc
NAME TYPE CLUSTER-IP EXTERNAL-IP PORT(S)
AGE
kubernetes ClusterIP 10.2.0.1 <none> 443/TCP
158d
myservice ClusterIP 10.2.96.175 <none> 80/TCP
40s
Answer: A
NEW QUESTION # 17
Score: 7%
Task
Given an existing Kubernetes cluster running version 1.20.0, upgrade all of the Kubernetes control plane and node components on the master node only to version 1.20.1.
Be sure to drain the master node before upgrading it and uncordon it after the upgrade.
You are also expected to upgrade kubelet and kubectl on the master node.
Answer:
Explanation:
See the solution below.
Explanation
SOLUTION:
[student@node-1] > ssh ek8s
kubectl cordon k8s-master
kubectl drain k8s-master --delete-local-data --ignore-daemonsets --force apt-get install kubeadm=1.20.1-00 kubelet=1.20.1-00 kubectl=1.20.1-00 --disableexcludes=kubernetes kubeadm upgrade apply 1.20.1 --etcd-upgrade=false systemctl daemon-reload systemctl restart kubelet kubectl uncordon k8s-master
NEW QUESTION # 18
List "nginx-dev" and "nginx-prod" pod and delete those pods
Answer:
Explanation:
kubect1 get pods -o wide
kubectl delete po "nginx-dev" kubectl delete po "nginx-prod"
NEW QUESTION # 19
You have two Kubernetes deployments running in different namespaces, 'namespace-A' and 'namespace-B'. You need to allow communication from pods in 'namespace-A' to a specific pod in namespace-B'. How can you achieve this using NetworkPolicies?
Answer:
Explanation:
See the solution below with Step by Step Explanation.
Explanation:
Solution (Step by Step) :
1 . Create a NetworkPolicy in namespace-R:
- Create a NetworkPolicy in 'namespace-R that allows traffic to the specific pod in 'namespace-B'.
- Code:
2. Ensure the Target Pod has the Correct Label: - Ensure that the specific pod in 'namespace-B' has the label 'app: target-pod'. 3. Apply the NetworkPolicy: - Apply the NetworkPolicy using 'kubectl apply -f networkpolicy.yaml' .,
NEW QUESTION # 20
Schedule a pod as follows:
* Name: nginx-kusc00101
* Image: nginx
* Node selector: disk=ssd
Answer:
Explanation:
See the solution below.
Explanation
solution


NEW QUESTION # 21
Create a busybox pod that runs the command "env" and save the output to "envpod" file
Answer:
Explanation:
See the solution below.
Explanation
kubectl run busybox --image=busybox --restart=Never --rm -it -- env > envpod.yaml
NEW QUESTION # 22
Create a ETCD backup of kubernetes cluster
Note : You don't need to memorize command, refer -
https://kubernetes.io/docs/tasks/administer-cluster/configureupgrade-etcd/ during exam
- A. ETCDCTL_API=3 etcdctl --endpoints=[ENDPOINT] --cacert=[CA CERT]
--cert=[ETCD SERVER CERT] --key=[ETCD SERVER KEY] snapshot save
[BACKUP FILE NAME]
In exam, cluster setup is done with kubeadm , this means ETCD
used by the kubernetes cluster is coming from static pod.
kubectl get pod -n kube-system
kubectl describe pod etcd-master -n kube-system
You can locate the information on
endpoint: - advertise-client-urls=https://172.16.0.18:2379
ca certificate: - trusted-cafile=/etc/kubernetes/pki/etcd/ca.crt
server certificate : - certfile=/etc/kubernetes/pki/etcd/server.crt
key: - key-file=/etc/kubernetes/pki/etcd/server.key
To Create backup
export ETCDCTL_API=3
(or)
ETCDCTL_API=3 etcdctl ETCDCTL_API=3 etcdctl --
endpoints=https://172.17.0.15:2379 --
key=/etc/kubernetes/pki/etcd/server.key snapshot save etcdsnapshot.db
//Verify
ETCDCTL_API=3 etcdctl --write-out=table snapshot status
snapshot.db - B. ETCDCTL_API=3 etcdctl --endpoints=[ENDPOINT] --cacert=[CA CERT]
--cert=[ETCD SERVER CERT] --key=[ETCD SERVER KEY] snapshot save
[BACKUP FILE NAME]
In exam, cluster setup is done with kubeadm , this means ETCD
used by the kubernetes cluster is coming from static pod.
kubectl get pod -n kube-system
kubectl describe pod etcd-master -n kube-system
You can locate the information on
endpoint: - advertise-client-urls=https://172.17.0.15:2379
ca certificate: - trusted-cafile=/etc/kubernetes/pki/etcd/ca.crt
server certificate : - certfile=/etc/kubernetes/pki/etcd/server.crt
key: - key-file=/etc/kubernetes/pki/etcd/server.key
To Create backup
export ETCDCTL_API=3
(or)
ETCDCTL_API=3 etcdctl ETCDCTL_API=3 etcdctl --
endpoints=https://172.17.0.15:2379 --
cacert=/etc/kubernetes/pki/etcd/ca.crt --
cert=/etc/kubernetes/pki/etcd/server.crt --
key=/etc/kubernetes/pki/etcd/server.key snapshot save etcdsnapshot.db
//Verify
ETCDCTL_API=3 etcdctl --write-out=table snapshot status
snapshot.db
Answer: B
NEW QUESTION # 23
How would you configure a PersistentVolumeClaim with a storage class for a specific type of storage, such as SSD or NVMe, and how would you specify the storage capacity?
Answer:
Explanation:
See the solution below with Step by Step Explanation.
Explanation:
Solution (Step by Step) :
1. Create a Storage Class:
- Define a storage class that specifies the desired storage type (SSD or NVMe) and any other relevant parameters.
2. Define the PersistentVolumeClaim: - Create a PersistentVolumeClaim with the storage class you defined in the previous step. Specify the desired storage capacity using the 'resources.requests.storage' field.
3. Apply the Changes: - Apply the storage class and PersistentVolumeClaim using 'kubectl apply -f fast-storage.yaml' and 'kubectl apply -f my-pvc.yaml' - The storage class 'fast-storage' in this example specifies the use of AWS EBS volumes with the 'gp2' volume type (SSD) and encryption enabled. - The PersistentVolumeClaim is configured to use the 'fast-storage' class and requests IOGi of storage. This configuration ensures that the PVC provisioned for the pod uses the specified storage class (SSD in this case) and the requested storage capacity.
NEW QUESTION # 24
You have a complex application with multiple services running in a Kubernetes cluster. Some services communicate with each other over the cluster network, while others need to access external services over the internet. You need to configure CoreDNS to handle both internal and external DNS resolution in a secure and efficient manner.
Answer:
Explanation:
See the solution below with Step by Step Explanation.
Explanation:
Solution (Step by Step) :
1. Configure CoreDNS for Internal DNS:
- Create a CoreDNS ConfigMap named 'coredns' with the following configuration:
-
2. Configure CoreDNS for External DNS: - If you need to resolve external domains, you can use CoreDNS's 'forward' plugin to forward requests to external DNS servers. You can configure 'forward' in the Corefile, or use environment variables to dynamically set the upstream servers.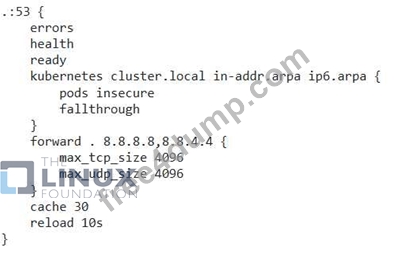
3. Configure Services with External Names: - If you need to access external services, configure their services in Kubernetes with the 'externalName' field.
4. Use Secure DNS: - Enable DNS over TLS (DOT) or DNS over HTTPS (DOH) in your CoreDNS configuration to ensure secure DNS resolution.
5. Test DNS Resolution: - Test DNS resolution for internal and external domains using the 'nslookup command from pods in your cluster.
NEW QUESTION # 25
......
The CKA exam is a hands-on, practical test that requires candidates to perform tasks on a live Kubernetes cluster. CKA exam is conducted online and comprises of 24 performance-based tasks that must be completed within 3 hours. To pass the exam, candidates must score 74% or higher. The CKA certification is valid for three years, after which candidates can renew their certification by passing a recertification exam. The CKA program provides a proven path to career advancement and recognition as a Kubernetes expert.
CKA [Oct-2025] Newly Released] Exam Questions For You To Pass: https://www.free4dump.com/CKA-braindumps-torrent.html
CKA Answers CKA Free Demo Are Based On The Real Exam: https://drive.google.com/open?id=1-Dk0v7dc_7MKRejtq7Dba9s8s4IGrRnK